Individual Tiramisu

When my husband and I were first married I was a TERRIBLE cook. Honestly, I fed the poor man undercooked eggs, undercooked chicken and horrific tiramisu all in the first year of our marriage. It’s a wonder the man is still alive. I fixed the egg and chicken situation pretty quickly but it took me 7 years to brave Tiramisu again. Thankfully, this recipe doesn’t even involve baking and even if it did, I feel much more confident in my ability to actually succeed in making it. 🙂

I have to tell you the mascarpone mousse in this recipe is to die for. Honest to goodness, we were fighting like savages over the bowl. It can be prepared in advance, which is always a plus and being served in wine glasses is built in portion control. Not like this Tiramisu is in any way diet friendly but hey, at least you can’t go cut another piece right? We absolutely loved how nicely the dessert presented and it was a fabulous retreat from cookies, brownies, cakes and pies that we’ve been eating this Holiday Season. If you’re planning a fun party or just making this for someone special, this is bound to be a hit!

Enjoy!

Individual Tiramisu
Barely Adapted from: Well Fed
Serves 4

INGREDIENTS
1 1/2 cups heavy cream
1/2 cup sugar
8 ounces mascarpone cheese, room temperature
1/4 cup Marsala wine
1 1/2 cups espresso or strong coffee
1/4 cup dark rum (Brandy or Frangelico would work here as well)
lady fingers
2 ounces of dark chocolate
unsweetened cocoa powder for dusting tiramisu

METHOD
Whip the heavy cream until soft peaks form. Add the sugar and whip a little bit longer until the sugar is thoroughly integrated. Scoop out about a cup or so of the whipped cream and set aside to use later to top the finished tiramisu.

In a separate bowl, whisk the mascarpone and Marsala together until smooth and creamy. Gently fold a third of the whipped cream into the mascarpone and Marsala mixture to lighten. Fold in the rest of the whipped cream in to combine.

Using a serrated knife, cut each ladyfinger in half. I also sliced off the little, rounded ends so the ladyfingers fit more easily into the wine glasses.

Stir the espresso or coffee and the brandy together in a small bowl. Dip each ladyfinger half in the coffee-brandy mixture, making sure they aren’t in submerged for more than 4 seconds, otherwise they may dissolve into mush. Place two laydfinger halves into the bottom of the wine glass. Spoon over some of the mascarpone-cream to cover and then using a microplane, grate over some of the dark chocolate. Top with two more layers of coffee soaked ladyfingers, mascarpone-cream and grated chocolate. Cover each glass with plastic wrap and refrigerate for at least 3 hours or overnight.


Posted in Desserts | 5 Comments

Cider Wassail

Growing up, we always had Wassail at Christmas. It’s just a perfect warming Holiday drink. Sure, it was 80 degrees here in Florida on Christmas Day this year but that’s besides the point. We cranked the A.C. down and got our fill of this delicious apple-y cinnamon-y goodness. I converted this to a crock pot recipe because I didn’t have the burner space available and the option to keep it on warm all day was pretty appealing. This drink would be wonderful anytime during the Holiday Season and is perfect for parties. Enjoy!


Cider Wassail

Adapted from here

2 quarts apple cider
2 whole oranges, sliced into rings
3/4 cup pineapple juice
1 tablespoon brown sugar
1/2 teaspoon lemon juice
2 cinnamon sticks (3 inches)
1 dash ground cinnamon
1 dash ground cloves

In a large crock pot, combine all of the ingredients, stir well to dissolve sugar. Put crock pot on high heat setting to warm up, this should take about an hour. Once Cider Wassail is hot, reduce crock pot setting to warm to hold throughout the day. Serve hot in mugs.

Posted in Food for the Holidays!, Quick and Easy Recipes | Comments Off on Cider Wassail

Chicken Tortilla Soup

I’m pretty stoked to share this recipe with you. Not only because it is low-calorie and delicious but also because it’s a recipe that I tested the greatest cooking shortcut in the history of time on. Sure, I am totally exaggerating but honestly it is such a great tip! Thanks to my friend over at Stick A Fork In It, I will NEVER shred chicken by hand again. Check out this post for all the fun details. My friend Abby would have killed for this secret 6 months ago when she helped shred 13 lbs of chicken for me by hand. As if I needed another reason to love my Kitchen Aid Mixer, this really seals the deal.
Now onto the soup. It’s delicious, easy, low-calorie (150 calories a bowl!) and a crock-pot recipe. If none of those things sell you then I don’t know what will. 🙂

Chicken Tortilla Soup
Modified from Eat Yourself Skinny

Poaching Water: 6 cups water, 1 teaspoon kosher salt, black pepper, 1 teaspoon cumin, 2 cloves garlic, 1 bay leaf
1 pound boneless skinless chicken breast
1 (15 ounce) can whole peeled tomatoes, mashed
1 (10 ounce) can enchilada sauce- I used hot but use medium if you don’t like spice, the hot gave it quite a kick!
1 medium onion, chopped
1 (4 ounce) can chopped green chile peppers
2 gloves garlic, minced
1 (14.5 ounce) can chicken broth (I used fresh chicken stock)
1 tsp. cumin
1 tsp. chili powder
1 tsp. salt
1/4 tsp. black pepper
1 bay leaf
1 (10 ounce) package frozen corn
1 Tbsp. chopped cilantro
7 corn tortillas
1 lime
vegetable oil

Bring poaching water to a simmer with salt, pepper, garlic, bay leaf and cumin and simmer chicken for 15-20 minutes. Reserve 2 cups of this water, set aside. With cooking shears or a fork, thoroughly shred your chicken (OR USE THIS AMAZING METHOD!) and place in slow cooker. Add tomatoes, enchilada sauce, onion, green chiles and garlic. Pour in reserved poaching water and chicken broth, and season with cumin, chili powder, salt, pepper, and bay leaf. Stir in corn and cilantro. Cover, and cook on Low setting for 6 to 8 hours or on High setting for 3 to 4 hours.

Preheat oven to 350 degrees F. Lightly brush both sides of tortillas with oil. Cut tortillas into strips, then spread on baking sheet. I sprinkled a bit of taco seasoning over tortillas as well to give them a great flavor. Bake in preheated oven until crisp, about 10 minutes. To serve, sprinkle tortilla strips over soup and garnish with a lime. Enjoy!

Posted in 500 Calories or less, Chicken Dishes, Soups | 4 Comments

Christmas Weekend Extravaganza Menu: 12/24-12/25

I am so excited about Christmas. One of my favorite things about Christmas (other than the spiritual meaning to us) is the hosting, cooking and baking that come with the Holiday. I have a Christmas Weekend Extravaganza planned. First, a dinner for just my husband and I on Christmas Eve. It’s a tradition for us. We find some time in this crazy season, make a yummy gourmet dinner and then watch our favorite Christmas movie, White Christmas. Next, we will be hosting my family for Christmas Breakfast and last but not least Christmas dinner for my lovely in-laws. I can’t wait to get this week started!

Christmas Eve Dinner
Caprese Salad
Osso Bucco
(Braised Veal Shanks with a red wine pan sauce)
Duchess Potatoes
Roasted Haricot Verts
Individual Tiramisu

Christmas Morning Breakfast
Cinnamon Rolls
Frittata with Asparagus, Tomato and Fontina
Fruit Platter
Chocolate goodies courtesy of my Mom 🙂
Cider Wassail


Christmas Evening Dinner

Herb Roasted Turkey
Roasted Garlic Mashed Potatoes
Roasted Asparagus wrapped in prosciutto
Brussels Sprouts with brown butter and lardons
Grandmas Famous Macaroni and Cheese
Salad with Pomegranate Shallot Vinaigrette
French Bread with compound butter
Pumpkin Mousse Parfait

Posted in Menu Plan Suggestions | 2 Comments

Menu: 12/18-12/23

Can you even BELIEVE it’s almost Christmas? The older I get (blah!) the faster the time flies. I’m really looking forward to this week. I won’t be making too many meals at home but will be doing lots of baking and prep for Christmas. I’ll be posting my Holiday Menu in just a few days, so be on the look out for that!

Sunday: Picnic in the square with friends (watching ELF on an outdoor screen)- Buttermilk Fried Chicken, Coleslaw, Potato Salad and baked beans.

Monday: Chicken with Fontina, Pancetta and Sage, roasted sweet potatoes, salad

Tuesday: Lobster, crab cakes and mussels. My friends got a Groupon for live lobsters, I can’t wait!

Wednesday: Out with the hubby!

Thursday: Cajun Chicken Pasta

Friday: Cilantro Lime Shrimp, Herby Basmati rice and Grilled Corn

Posted in Menu Plan Suggestions | 2 Comments

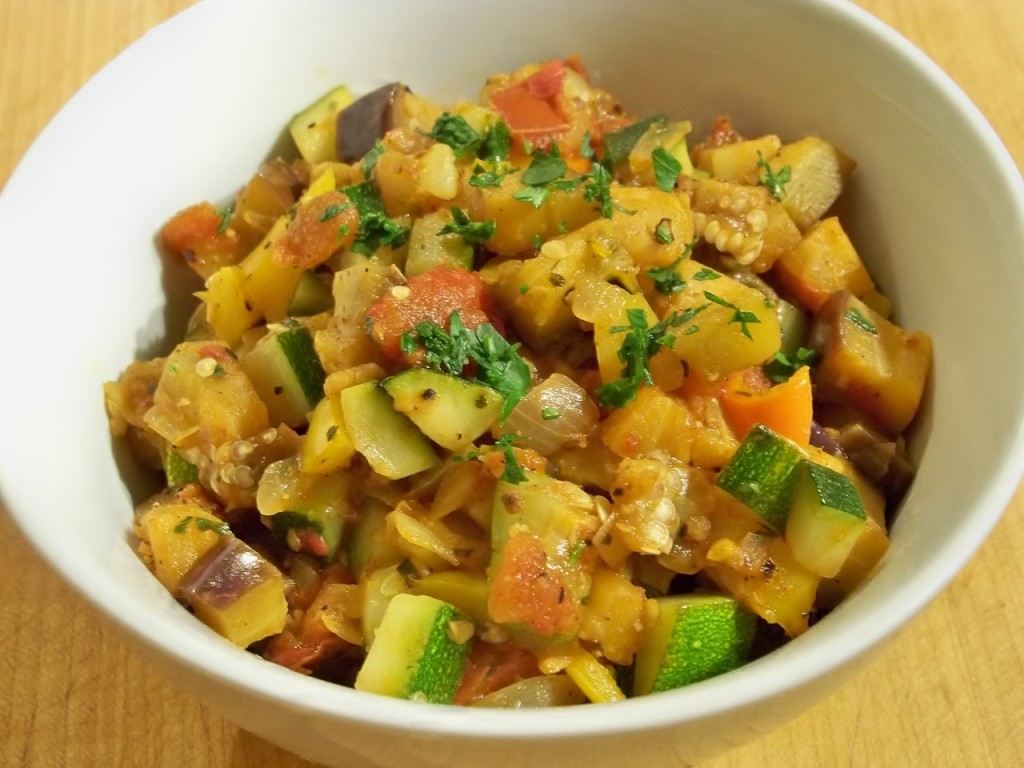
Ratatouille

A side dish so delicious they made a movie out of it! 🙂 Ok, now that I’ve got that out of my system. Let me tell you about this amazing side dish.
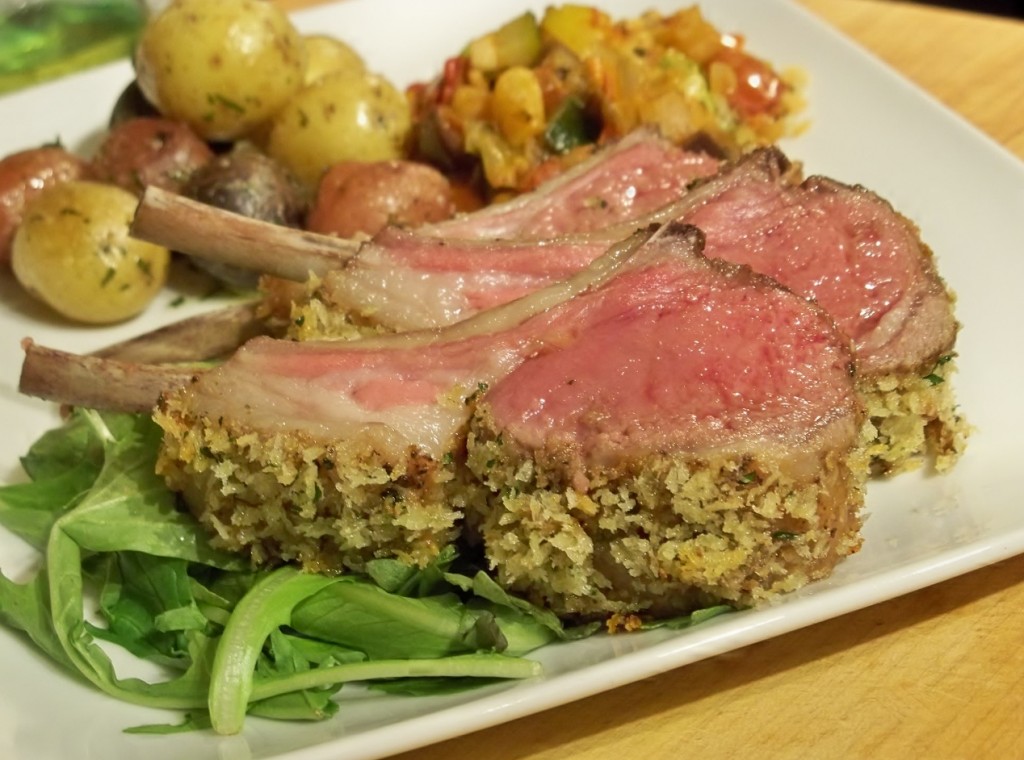
I had a hard time convincing my husband to try Ratatouille, but once he actually did he was in love. You have to understand the man REALLY hates eggplant. So to say he was asking for seconds and stealing bites from the pan is a real compliment. I’ve seen this served with the vegetables sliced and perfectly assembled in a pan but I actually prefer the rustic style of chopping everything up. It’s an incredibly simple peasant dish where the vegetables really shine. The flavors of the tomato, zucchini and eggplant just work so well together. It’s easy to make and tasted delicious with our Rack of Lamb Provencal but it tastes great with just about anything!

If you’re looking for a new side dish give this a try!

Ratatouille

Inspiration: Chef Pierre P

2 tablespoons olive oil
1/2 large eggplant (or 1 medium eggplant, chopped into cubes)
1 medium zucchini, cubed
1/2 onion, diced
2 garlic cloves, minced
1 large tomato, chopped
3 small sweet peppers or 1/2 red bell pepper, diced
salt and pepper to taste
chopped parsley for garnish

1. In a large skillet heat olive oil over medium heat. Saute onion and peppers 2-3 minutes until onion and pepper begins to soften.
2. Next add eggplant, zucchini and garlic. Saute 3-5 minutes until eggplant and zucchini begin to soften. Add tomatoes. Season to taste with salt and pepper. Allow to saute, stirring occasionally for another 5-8 minutes. Garnish with fresh chopped parsley and serve immediately.

Posted in Side Dishes, Vegetarian Dishes | 2 Comments

Rack of Lamb Provencal

There are few days I enjoyed more in class than the day my Chef announced we were making rack of lamb. Naturally I was REALLY excited. Finally all of those crazy expensive lab fees for class were paying off! In most of my classes (with the exception of baking) the Chefs never really give you amounts they give you ingredients and basically guide you so that you should know about how much of each ingredient you may need. It sounds tricky and it is! Many times I have watched students get yelled at for adding too much of something or not enough of something else. So I really paid attention as I was making the crust for this so I would know exactly what I would need to replicate the dish for my jealous husband.Thankfully I got it right on the money and my hubby was SO pleased. I prepared this dish after he reached his first weight loss goal of 25 lbs. He liked it so much he asked for it again when he hit 30 lbs lost! What an amazing dish. If you’ve got a special meal planned- make this. It’s delicious and honestly pretty easy. You don’t have to tell your guests or loved ones that though, that can be our secret. 😉

Rack of Lamb Provencal
Source: Chef Pierre P.

1 Frenched Rack of Lamb (you can easily double this recipe for 2 racks)
Kosher Salt
Fresh Ground Pepper
1/4 teaspoon Garlic Powder
1 1/2 tablespoons olive oil

Crust:
3 tablespoons butter
2 cloves garlic, minced
1 cup panko breadcrumbs
1 tablespoon chopped parsley
1 teaspoon Dijon mustard

Preheat oven to 375

1. Season rack of lamb with salt, pepper (to your liking) and garlic powder.
2. In a large pan, heat olive oil over medium heat. Sear rack on all sides, 1 to 2 minutes per side. The curved side will not sear completely this is O.K. Remember to do both small sides, standing the rack upright to do so. Remove from pan once all sides are finished.
3. Remove excess oil from pan. Reduce heat to medium low. Add butter to start crust mixture. Gently saute garlic (being careful not to burn it) for 1 minute. Add bread crumbs and parsley. Stir to combine. Set aside to cool for 3-5 minutes.
4. Using a small brush, brush Dijon mustard over the top of the rack of lamb. (the largest part where the fat covers the meat).
5. Transfer lamb to baking dish. Pat crumbs over Dijon mustard to form a crust. The crust will be a little thick. Some of it will fall off during the course of cooking, moving and carving so it will be fine.
6. Roast uncovered for 15 minutes- check internal temperature. See notes below for further instructions. Once lamb is out of the oven, cover with foil and allow to rest 5 minutes before carving. To carve: Stand upright with bones facing upwards, cut down between bones, cutting each chop off the rack.

We pulled ours out at 15 minutes to check the temperature. Because our oven is a little wonky and can sometimes fluctuate we put it back in for 5 more minutes making the total cooking time 20 minutes. This gave us a beautiful rareish medium rare. In the words of Nigella Lawson, “Nothing a good vet couldn’t bring back”. 😉 Your oven may be different. Be sure to take the meat out of the oven 5 to 10 degrees before your preferred internal temp as the lamb will need to rest before carving and will carry over cook while resting.

Bloody rare: 115 to 125 degrees F
Rare: 125 to 130 degrees F
Medium rare: 130 to 140 degrees F
Medium: 140 to 150 degrees F

Posted in Food for the Holidays!, Lamb Dishes | 4 Comments